2023. 1. 30. 00:00ㆍOpenSSL
OpenSSL 을 이용해서 개발용 인증서를 만들 수 있다.
일단 OpenSSL 을 다운로드 받자.
window 를 기준으로 할 것이기 때문에 window 에서 OpenSSL 을 설치하는 방법을 알아보자
아래 링크에서 다운로드 받자
https://slproweb.com/products/Win32OpenSSL.html
Win32/Win64 OpenSSL Installer for Windows - Shining Light Productions
Minimum system requirements: Windows XP or later 32MB RAM 200MHz CPU 30MB hard drive space Recommended system requirements: Windows XP or later 128MB RAM 500MHz CPU 300MB hard drive space September 9, 2021 - OpenSSL 3.0 is available. Users should currently
slproweb.com
내컴퓨터의 환경변수에 OpenSSL 에 대한 설정을 추가 하자

Path 에 편집을 누르고 openssl 의 bin 폴더를 추가하자

일단 인증서는 root 인증서를 생성하고 해당 root 인증서로 서명한 ca 인증서 를 만들것이다.
1. 루트키 생성
openssl ecparam -out root.key -name prime256v1 -genkey2. 루트 인증서 만들기 및 자체 서명
openssl req -new -sha256 -key root.key -out root.csr
openssl x509 -req -sha256 -days 36500 -in root.csr -signkey root.key -out root.crt
3. 실제 사용할 인증서의 키 만들기
openssl ecparam -out test.key -name prime256v1 -genkey4. csr 생성시 사용할 미리 정의된 config 파일
./conf/test.conf
[req]
distinguished_name = req_distinguished_name
req_extensions = v3_req
prompt = no

[req_distinguished_name]
C   = KR
ST  = Seoul
L   = Seoul
O   = SW
OU  = YoutubeTest
CN  = test_ecparam

[v3_req]
keyUsage = nonRepudiation, digitalSignature, keyEncipherment
extendedKeyUsage = serverAuth
subjectAltName = @alt_names

[alt_names]
DNS.1 = localhost
DNS.2 = *.test.com
IP.1 = 127.0.0.1
IP.2 = 192.168.0.3
**alt_names 에는 인증서가 인증할 domain name 과 ip address 를 포함해야 한다. **
**만약 본인의 ip 가 123.111.111.154 라면 해당 IP 를 추가해야
해당 인증서를 사용한 webservice 를 remote 에서 webbrowser 를 통해 호출시
정상적으로 호출된다. 그렇지 않으면 경고가 뜬다.**
5. 실제 사용할 인증서의 CSR 생성 및 CSR 내용 확인
openssl req -new -sha256 -key test.key -out test.csr -config ./conf/test.conf
openssl req -in test.csr -noout -text
6. CSR 및 키를 사용하여 인증서를 생성하고 CA의 루트 키로 서명
openssl x509 -req -in test.csr -CA root.crt -CAkey root.key -CAcreateserial -out test.crt -days 3650 -sha256 -extfile ./conf/test.conf -extensions v3_req7. pfx 로 생성 (비밀번호 없이 생성)
openssl pkcs12 -export -out test.pfx -inkey test.key -in test.crt -certfile root.crt -passout pass:이 상태에서 test.crt 를 더블클릭하면 아래와 같이 정보가 부족하다고 나온다.

우리가 만든것은 사설 인증서 이기 때문에 OS 의 trusted 영역에 설치되어 있지 않다.
root 에 대한 정보가 없기 때문에 chain 이 연결되지 않고 관련 정보를 가져온지 못한다.
또한 그렇기 때문에 안전하지 않은 인증서로 생각하는 것이다. 이문제를 해결해 보자
만들어진 test.pfx 를 설치 더블클릭 하여 설치 하자
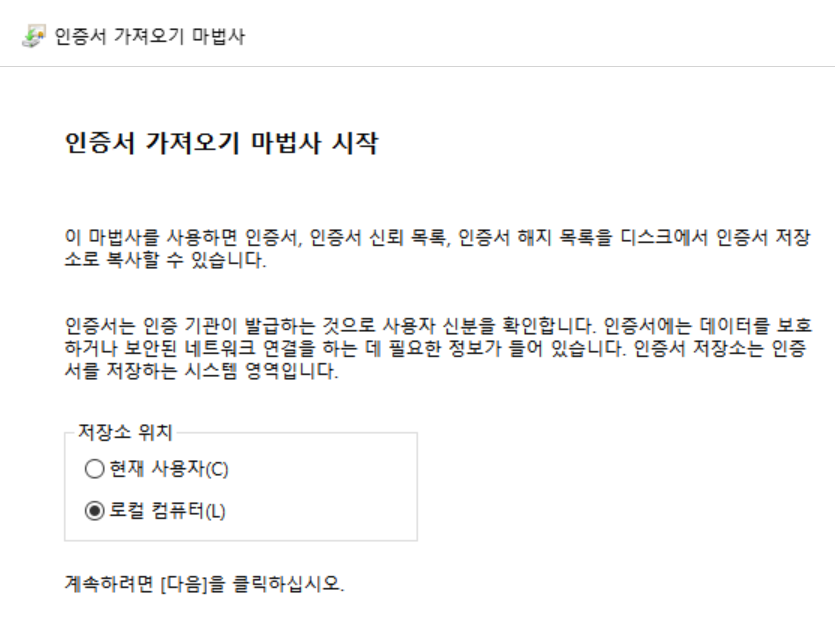
다음
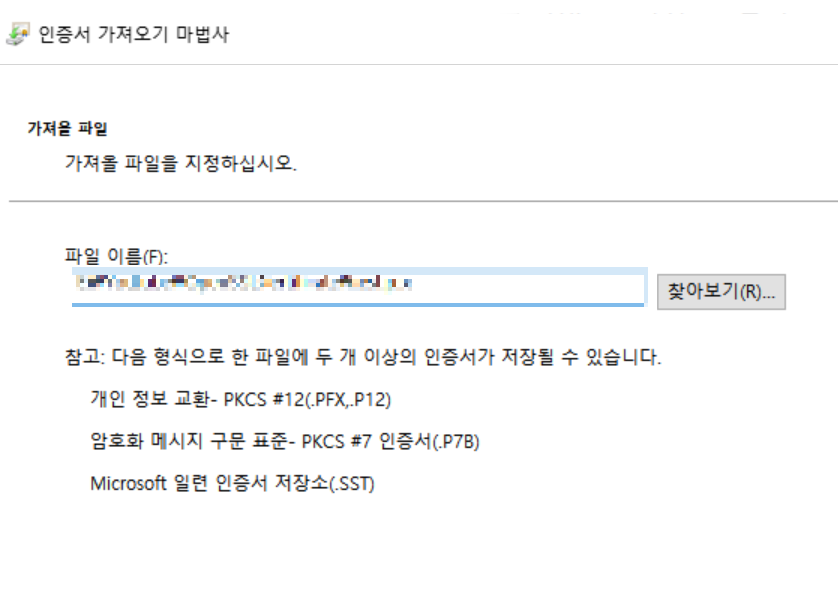
다음

다음

마침
이제 다시 test.crt 를 더블클릭 해보자
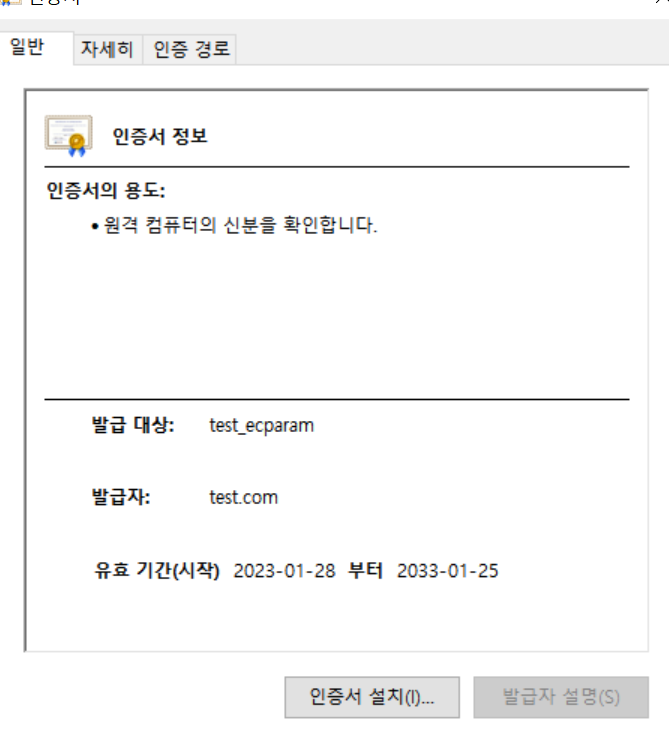
이제 올바른 인증서라고 인식한다.
이 인증서를 이용해서 https 에 server 등에서 활용할 수 있다.
관련영상