2023. 8. 7. 00:00ㆍASPNET/ASPNET 7
일반적으로 back end api 에 접근 하기 위한 여러가지 인증 방식이 있다
그중에서 api key 를 발급하여 client 에서 특정키를 가지고 있으면 접근 가능하도록 하는 방식을 알아보겠다.
가장많이 쓰이는 방식은 아래와 같이 특정 apikey 를 미리 정의해 두고
해당 key 를 가지고 있는 client 들은 접근 가능하도록 하는 것이다.
apikey = "abcdefg112345"
일반적으로 cloud system 이나 sass(service as a service) 등에서 많이 사용된다.
이것과는 약간다른방식으로 보안을 조금 더 신경쓴 방식있다.
- public key 를 client 에 발급하고 특정 secret 를 encryption 해서 server 에 전달
- server 에서는 private key 를 가지고 secret 를 decryption 해서 인증
우리는 이 방법을 이용해 보자.
일단 기존 작업하던거에서 다음 두 파일을 생성하자
Features/Key/Endpoints.cs
Features/Key/Generate.cs
Generate.cs 가 실제 key 파일을 생성하고 db에 저장할 내용이다.
다음과 같이 key 파일을 생성하자
Key/Generate.cs
public class Generate
{
    public class Command : IRequest<Response>
    {
        public string Id{get;set;}
    }

    public class Response : BaseResponse
    {
        public string? PublicKey { get; set; }
    }

    public class CommandHandler : IRequestHandler<Command, Response>
    {
        private readonly BaseDbContext _dbContext;

        public CommandHandler(BaseDbContext dbContext)
        {
            _dbContext = dbContext;
        }

        public async Task<Response> Handle(Command request, CancellationToken cancellationToken)
        {
            var response = new Response { Result = false };
            using var rsa = RSA.Create();
            var publicKey = rsa.ExportSubjectPublicKeyInfoPem();
            var privateKey = rsa.ExportPkcs8PrivateKeyPem();
            response.PublicKey = publicKey;

            await _dbContext.Keys.AddAsync(new()
            {
                  Id = request.Id,
                  PrivateKey = Encoding.UTF8.GetBytes(privateKey),
                  PublicKey = Encoding.UTF8.GetBytes(publicKey)
            });

            await _dbContext.SaveChangesAsync();
			response.Result = true;
            return response;
        }
    }
}
위에서 BaseDbContext 라고 있는데 이전 강좌들을 봤다면 어떤 내용인지 알것이다.
아래 강좌에서 ApiServerContext 에 해당하는 것이 BaseDbContext 이다.
https://yogingang.tistory.com/409
Rest API Template 만들기 - EP 07 (EF Core - Migration and Update)
기존 solution 에 프로젝트를 하나 추가 하자. .NET 또는 .NET Standard 용 library 가 있을 것이다. 추가하자 Project 명은 Infrastructure 라고 지정하자. 최신 .net 을 지원하도록 framework 를 설정하자 (현재 시점
yogingang.tistory.com
db 에 저장하기 위한 Persistance Model 의 이름은 Keys 이다.
이것이 그대로 table 이 된다.
Models/Key.cs
public class Keys
{
    [Key]
    [MinLength(1), MaxLength(100)]
    public string Id { get; set; }
    public byte[] PrivateKey { get; set; }
    public byte[] PublicKey { get; set; }
}
이제 BaseDbContext 와 SqlServerContext 를 알아보자
BaseDbContext.cs
public partial class BaseDbContext : DbContext
{
    protected readonly IConfiguration _configuration;
    protected int MaxRetryCount = 3;

    public BaseDbContext(IConfiguration configuration)
    {
        _configuration = configuration;
    }

    protected BaseDbContext(IConfiguration configuration, DbContextOptions options) : base(options)
    {
        _configuration = configuration;
    }
    public BaseDbContext(IConfiguration configuration, DbContextOptions<BaseDbContext> options)
        : base(options)
    {
        _configuration = configuration;
    }

    public DbSet<Keys> Keys { get; set; }

    /// <summary>
    /// Do not use Unicode as the default type for string
    /// </summary>
    /// <param name="modelBuilder"></param>
    private void DisableUnicodeToString(ModelBuilder modelBuilder)
    {
        foreach (var property in modelBuilder.Model.GetEntityTypes()
                .SelectMany(t => t.GetProperties())
                .Where(
                       p => p.ClrType == typeof(string)    // Entity is a string
                    && p.GetColumnType() == null           // No column type is set
                ))
        {
            property.SetIsUnicode(false);
        }
    }

    // partial 을 사용하려면 class 자체가 partial 이어야 한다.
    partial void OnModelCreatingPartial(ModelBuilder modelBuilder);
    /// <summary>
    /// database first 로 작업할 경우
    /// db 쪽 table 에 column 을 추가하거나 수정한 후
    /// scaffold 를 통해 모델을 생성하면 새로 모델이 생성되어
    /// 사용자가 추가한 몇가지 코드를 (OnModelCreating) 다시 복사후 옮겨줘야 한다.
    /// 이러한 문제를 해결하기 위해 OnModelCrateingPartial 에 사용자가 정의한
    /// 내용들을 처리 하도록 할 수 있다.
    /// </summary>
    /// <param name="modelBuilder"></param>
    partial void OnModelCreatingPartial(ModelBuilder modelBuilder)
    {
        //DisableUnicodeToString(modelBuilder);
    }
}
SqlServer 를 사용할 것이므로 (localdb) BaseDbContext 를 상속하여 SqlServerContext 를 구현하자
SqlServerContext.cs
public class SqlServerContext : BaseDbContext
{
    public SqlServerContext(IConfiguration configuration) : base(configuration)
    {
    }
    protected override void OnConfiguring(DbContextOptionsBuilder optionsBuilder)
    {
        if (!optionsBuilder.IsConfigured)
        {
            string? connectionString = _configuration.GetConnectionString("Server");
            optionsBuilder.UseSqlServer(connectionString,
                            x => x.EnableRetryOnFailure(MaxRetryCount));
        }
    }
}
이제 Extension method 를 이용하여 program.cs 에서 호출 할 것이다.
DbContextExtensions.cs
public static class DbContextExtensions
{

    public static void AddDataAccessServices(this IServiceCollection self, string connectionString, string dbProvider = "SqlServer", int maxRetryCount = 3)
    {
        if (dbProvider.Equals("MySql", StringComparison.OrdinalIgnoreCase))
        {
            self.AddDbContext<BaseDbContext, MySqlContext>
                (options => options.UseMySql(connectionString, ServerVersion.AutoDetect(connectionString),
                            x => x.EnableRetryOnFailure(maxRetryCount: maxRetryCount)));
        }
        else
        {
            self.AddDbContext<BaseDbContext, SqlServerContext>
                (options => options.UseSqlServer(connectionString,
                            x => x.EnableRetryOnFailure(maxRetryCount: maxRetryCount)));
        }
    }

}
이렇게 하는 이유는 rdbms 를 여러가지 사용할 경우 최소한의 변경으로 app 을 적용하기 위해서 이다.
이제 Program.cs 를 확인하자
Program.cs
string dbProvider = builder.Configuration.GetValue<string>("DbProvider") ?? string.Empty;
string connectionString = builder.Configuration.GetConnectionString("Server") ?? string.Empty;
builder.Services.AddDataAccessServices(connectionString, dbProvider);
appsettings.json
"DbProvider": "MsSql",
  "ConnectionStrings": {
    "Server": "Data Source=(localdb)\\MSSQLLocalDB;Database=IdentityServer;Trusted_Connection=True;"
  }
자 이런식으로 작업하면 multi db context 를 처리 가능 하다
어쨌든 중요한건 이게 아니니 다음으로 진행하자
Generate 를 했으면 이제 Endpoints 에서 호출해보자
Endpoints.cs
public class Endpoints : IEndPoints
{
    public void AddEndPoints(IEndpointRouteBuilder routes)
    {
        var group = routes.MapGroup("Key").WithOpenApi();
        group.MapPost("generate/rsa", async ([FromBody] Generate.Command request, IMediator mediator) => await mediator.Send(request));
    }
}
이제 swagger 로 호출 하면 public key 를 return 하는걸 확인 할 수 있다.
이제 이걸 test 해보자.
아주 간단한 vue3 project 를 만들어서 test 해볼것이다.
vue 관련해서는 일반적인 javascript framework 이므로 간단히 넘어가겠다.
우리는 jsencrypt 라는 library 를 사용할 것이다.
nodejs 를 설치하고 다음을 실행하자
npm create vue@latest아래와 같이 같단하게 설정하자
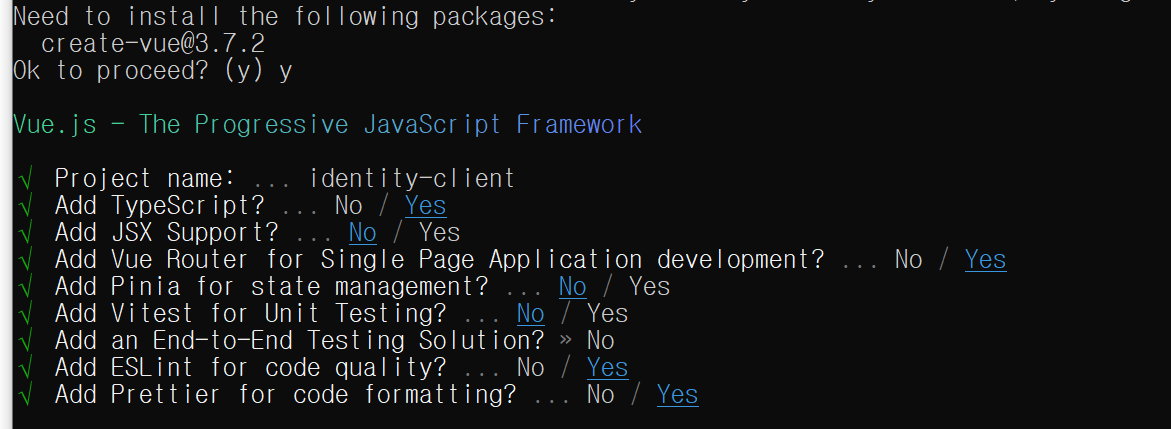
아래와 같이 실행하면 간단하게 vue3 spa app 을 생성할 수 있다.
(이제 우리도 full stak 이다!!)

이 Vue3 Template 을 수정하여 우리가 만든 identity server 가 정상적으로 동작하는지 확인해 보자.
axios 설치
npm install axiossrc/router/index.ts
import { createRouter, createWebHistory, type RouteRecordRaw } from 'vue-router'
import Register from '../views/Register.vue'
import Main from '../views/Main.vue'
import Login from '../views/Login.vue'

const routes: RouteRecordRaw[] = [
  {
    path: '/',
    name: 'Main',
    component: Main
  },
  {
    path: '/register',
    name: 'Register',
    component: Register
  },
  {
    path: '/login', // 로그인 페이지로 이동할 경로를 추가합니다.
    name: 'Login',
    component: Login
  }
]

const router = createRouter({
  history: createWebHistory(),
  routes
})

export default router
src/views/Main.vue
<template>
  <div>
    <h2>메인 페이지</h2>
    <p v-if="isLoggedIn">로그인되었습니다.</p>
    <p v-else>로그인이 필요합니다.</p>
    <button v-if="!isLoggedIn" @click="login">로그인</button>
    <button v-else @click="logout">로그아웃</button>
    <button v-if="isLoggedIn" @click="hello">hello</button>
    <p>{{ message }}</p>
  </div>
</template>

<script setup lang="ts">
import { ref, onMounted } from 'vue'
import { useRouter } from 'vue-router'
import axios from 'axios'

const isLoggedIn = ref(false)
const message = ref()
const router = useRouter()

// const isLoggedIn = computed(() => {
//   return !!sessionStorage.getItem('token')
// })

// watch(
//   () => sessionStorage.getItem('token'),
//   (newValue) => {
//     isLoggedIn.value = !!newValue
//   }
// )

onMounted(() => {
  isLoggedIn.value = sessionStorage.getItem('token') !== null
})

const login = () => {
  // 로그인 로직을 여기에 추가 (예시로 간단히 isLoggedIn 값을 true로 변경합니다.)
  //isLoggedIn.value = true;
  router.push({ name: 'Login' }) // 로그인 버튼을 누르면 로그인 페이지로 이동합니다.
}

const logout = () => {
  // 로그아웃 로직을 여기에 추가 (예시로 간단히 isLoggedIn 값을 false로 변경합니다.)
  sessionStorage.removeItem('token')
  isLoggedIn.value = false

  router.push({
    name: 'Main',
    params: { type: 'detail' },
    query: { id: 'logout', time: Date.now() }
  })
}

const hello = async () => {
  try {
    const response = await axios.get('https://localhost:7172/authentication', {
      headers: {
        Authorization: `Bearer ${sessionStorage.getItem('token')}`
      }
    })
    message.value = response.data
  } catch (error) {
    console.error('로그인 실패:', error)
    // 로그인 실패 시 오류 처리 로직 구현
  }
}
</script>
src/views/Register.vue
<template>
  <div>
    <h2>회원가입</h2>
    <form @submit.prevent="registerUser">
      <div>
        <label for="username">사용자명</label>
        <input type="text" v-model="username" id="username" required />
      </div>
      <button type="submit">회원가입</button>
    </form>
  </div>
</template>

<script setup lang="ts">
import { ref } from 'vue'
import axios from 'axios'
import { routeLocationKey } from 'vue-router'
import router from '@/router'

const username = ref('')

const registerUser = async () => {
  try {
    const response = await axios.post('https://localhost:7172/key/generate/rsa', {
      id: username.value
    })
    console.log('회원가입 성공:', response.data)
    sessionStorage.setItem('PublicKey', response.data.publicKey)
    // 회원가입 성공 후 로그인 등 다음 동작 수행
    router.push({ name: 'Login' })
  } catch (error) {
    console.error('회원가입 실패:', error)
    // 오류 처리 로직 구현
  }
}
</script>
이제 typescript 에서 rsa public key 를 이용해서 encrypt, decrypt 를 처리하기 위해 jsencrypt 를 설치하자.
npm install JSEncryptLogin.vue
<template>
  <div>
    <h2>로그인</h2>
    <form @submit.prevent="loginUser">
      <div>
        <label for="id">id</label>
        <input type="text" v-model="id" id="id" required />
      </div>
      <!-- <div>
        <label for="password">비밀번호</label>
        <input type="password" v-model="password" id="password" required />
      </div> -->
      <button type="submit">로그인</button>
    </form>
  </div>
</template>

<script setup lang="ts">
import { ref } from 'vue'
import axios from 'axios'
import { useRouter } from 'vue-router'
import JSEncrypt from 'JSEncrypt'

const id = ref('')

var encrypt = new JSEncrypt({
  default_key_size: '2048'
})
encrypt.setPublicKey(sessionStorage.getItem('PublicKey') ?? '')
const router = useRouter()

const loginUser = async () => {
  try {
   	const password = encrypt.encrypt(id.value)
    console.log(`password : ${password}`)
    const response = await axios.post('https://localhost:7172/token/generate/jwt', {
      id: id.value,
      password: password
    })
    console.log('로그인 성공:', response.data)
    sessionStorage.setItem('token', response.data.accessToken)

    // 로그인 성공 시 메인 페이지로 이동
    router.push({ name: 'Main' })
  } catch (error) {
    console.error('로그인 실패:', error)
    // 로그인 실패 시 오류 처리 로직 구현
  }
}
</script>
IdentityServer 쪽 수정이 필요한데 Token/Generate.cs 에 내용을 수정하자
Features/Token/Generate.cs
public class Generate
{
    public class Command : IRequest<Response>
    {
        public string Id { get; set; }
        public string Password { get; set; }
    }

    public class Response : BaseResponse
    {
        public string AccessToken { get; set; }
    }

    public class CommandHandler : IRequestHandler<Command, Response>
    {
        private readonly BaseDbContext _dbContext;

        public CommandHandler(BaseDbContext dbContext)
        {
            _dbContext = dbContext;
        }
        public async Task<Response> Handle(Command request, CancellationToken cancellationToken)
        {
            var response = new Response { Result = false };

            if (!(await Validation(request.Id, request.Password))) throw new Exception("Password is not valid");


            var tokenString = GenerateJweToken(request.Id);
            response.AccessToken = tokenString;
            response.Result = true;
            return await Task.FromResult(response);
        }

         private async ValueTask<bool> Validation(string id, string password)
        {
            var list = await _dbContext.Keys.Where(k => k.Id == id).ToListAsync();
            if (!list.Any()) return false;

            var item = list.SingleOrDefault();
            using var rsa = RSA.Create();
            rsa.ImportFromPem(Encoding.UTF8.GetString(item.PrivateKey));
            var decryptData = rsa?.Decrypt(Convert.FromBase64String(password), RSAEncryptionPadding.Pkcs1);
            var decryptString = Encoding.UTF8.GetString(decryptData);
            if (!decryptString.Equals(id)) return false;

            return true;

        }

        private string GenerateJweToken(string id)
        {
            var privateSigningKey = JweTokenConfigHelper.PrivateSigningKey;
            var publicEncryptionKey = JweTokenConfigHelper.PublicEncryptionKey;

            // JwtSecurityTokenHandler 의 향상된 버전 JsonWebTokenHandler
            var handler = new JsonWebTokenHandler();

            string token = handler.CreateToken(new SecurityTokenDescriptor
            {
                Audience = "IdentityServer",
                Issuer = "https://localhost:7172",
                Claims = new Dictionary<string, object> { { "sub", id } },

                // private key for signing
                SigningCredentials = new SigningCredentials(
                    privateSigningKey,
                    SecurityAlgorithms.EcdsaSha256),

                // public key for encryption
                EncryptingCredentials = new EncryptingCredentials(
                    publicEncryptionKey,
                    SecurityAlgorithms.RsaOAEP,
                    SecurityAlgorithms.Aes256CbcHmacSha512),
                Expires = DateTime.UtcNow.AddMinutes(10)
            }); ;

            return token;
        }
    }
이제 npm run dev 를 통해 실행해보자

사용자명에 1234 같은 아무 문자열이나 넣자. 회원가입을 누르자.
성공하면 자동으로 Login.vue 로 이동하게 될것이다.

id 에 1234 를 넣고 로그인 하면 로그인이 처리 될것이다.
이제 다른 브라우저를 뛰워서 같은 주소의 register 로 이동하여서
2345 로 가입 하자. 그리고 똑같이 2345로 로그인 해보자
1234 와 2345 는 서로 다른 browser 에서 가입했다.
각각 자신들의 sessionStorage 에 publickey 를 저장했으므로 값을 공유할 수 없다.
즉 첫번째 browser 에서 2345 로 로그인이 불가능하다
두번째 browser 에서는 1234로 로그인이 불가능 하다.
바로 이점을 활용하여 특정 machine 에 rsa key 를 주입 하고 이를 인증으로 이용할 수 있게 된다.
관련영상
'ASPNET > ASPNET 7' 카테고리의 다른 글
| 인증서버 - JWT 서명 및 payload 암호화 (JWE,JWS) (4) | 2023.07.31 |
|---|---|
| Rest API Template 만들기 - EP 10 (Refactoring - Features) (0) | 2023.01.19 |
| Rest API Template 만들기 - EP 09 (UnitTest) (0) | 2023.01.16 |
| Rest API Template 만들기 - EP 08 (DB 를 통해 AccessToken 및 RefreshToken 관리) (0) | 2023.01.12 |
| Rest API Template 만들기 - EP 07 (EF Core - Migration and Update) (0) | 2023.01.09 |